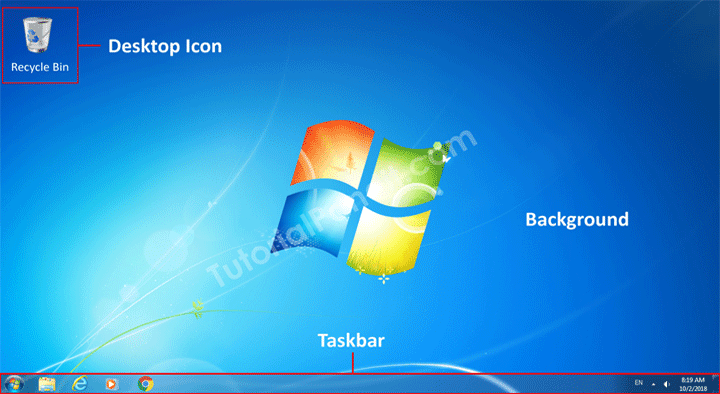
Taskbar एक आडि आयताकार पट्टी होती हैं जो Windows Desktop पर सबसे नीचे लगी होती हैं. यह Desktop की तरह Windows के कारण छिपती नही हैं. यह हमेशा Visible और Highlight रहती हैं इसलिए आसानी से देखी जा सकती हैं Taskbar की By Default Position Bottom Set रहती हैं. जिसे Top, Right, Left में बदला भी जा सकता हैं. और इसे एक जगह Lock भी किया जा सकता हैं. इसकी बनावट और दिखावट Windows OS Version पर निर्भर करती हैं. जो Version के हिसाब से भिन्न-भिन्न हो सकती हैं.

Taskbar में मुख्यत: चार भाग होते हैं. जिन्हे आप ऊपर Image में देख सकते हैं.
- Start Button
- Icons
- Notification Area
- Show Desktop Button
Start Button
Taskbar पर सबसे पहला और मुख्य भाग Start Button होता हैं. जो बांए तरफ नीचे कोने में स्थित रहता हैं. इसे Menu Button भी कहते हैं. इसकी बनावट भी Windows Version पर निर्भर करती हैं. यह गोल, वर्गाकार, आयताकार हो सकता हैं.
Start Button की सहायता से सभी Programs, Folders और Settings तक पहुँचा जाता हैं. यहाँ से अपने मन पसंद Program को ढूंढकर उसे Run कर सकते हैं और उसका Desktop Shortcut बना सकते हैं.
Taskbar Buttons or Middle Section
Taskbar के Middle Section पर कुछ Buttons भी Pinned रहते हैं. इन्हे Start Button के बाद देखा जा सकता हैं. By Default यहाँ कुछ ही Buttons Pinned रहते हैं जिन्हे जरूरत के अनुसार कम या ज्यादा भी किया जा सकता हैं.
Pinned Items के Icon के अलावा Currently Open Programs, Files, Folders या अन्य Items भी Taskbar पर दिखाई देते हैं.
Notification Area
Notification Area Taskbar में दांए तरफ स्थित रहता हैं. जो Users को कम्प्युटर से आने वाले विभिन्न Notifications और Messages को दिखाता हैं. पहले तो Notification Area में कुछ ही Icons दिखाई देते हैं. Upward Arrow पर क्लिक करके Hidden Icons को भी देखा जा सकता हैं.

Notification Area के कई अलग-अलग भाग होते हैं जिनका अलग-अलग कार्य होता हैं. इन्हे आप ऊपर Picture में देख सकते हैं.
- Language Icon – यह Icon Windows की Language Setting को Represent करता हैं. यहाँ पर Computer की Current Language को देखा जा सकता हैं. और Language Bar को Customize भी किया जा सकता हैं. Language Icon एक से अधिक Input Method Installed होने पर ही दिखाई देता हैं.
- Upward Arrow Icon – यह आईकन Hidden Items को Represent करता हैं. इस Arrow पर क्लिक करके Hidden Items को देखा जा सकता हैं.
- Flag Icon यह आईकन Operating System से आने वाले संदेशों को दिखाता हैं. जिन्हे Users इस आईकन पर क्लिक करके देख एवं Solve कर सकते हैं.
- Network Icon – यहाँ से Network and Sharing Center को Open किया जा सकता हैं. यह आईकन दर्शाता हैं कि वर्तमान में कम्प्युटर में इंटरनेट चल रहा हैं या बंद हैं.
- Volume Icon – यह आइकन Volume Setting को दर्शाता हैं. इस पर क्लिक करके Volume को Adjust किया जा सकता हैं.
- Date and Time – इस जगह पर वर्तामान Date और Time को दिखाया जाता हैं. Users इस आइकन पर क्लिक करके Date and Time Setting को Access कर सकता हैं.
Show Desktop Button
यह बटन Taskbar में दांए तरफ जोने में स्थित होता हैं. इसका आकार आयताकार होता हैं. जो Windows Version के अनुसार अलग-अलग हो सकता हैं. इसे Notification Area से एक खडी लाईन अलग करती हैं.
इस बटन पर क्लिक करके Users सीधे डेस्क्टॉप पर पहुँच जाते हैं. और सभी खुली हुई Windows Minimize हो जाती हैं. इस बटन पर माउस करसर को ले जाने पर खुली हुई Windows पारदर्शी हो जाती हैं. जिनसे Desktop को आसानी से देखा जा सकता हैं.
Taskbar पर Buttons को Pin करना
Taskbar पर किसी भी Item के बटन को दो तरीको से Pin किया जा सकता हैं. यानि लगाया जा सकता हैं.
- Right Click द्वारा
- Mouse Drag द्वारा
Right Click द्वारा Programs को Taskbar पर Pin करना
- सबसे पहले आप जिस Item को Taskbar पर Pin करना चाहते है उसके ऊपर Mouse की Right Click दबाईये.
- ऐसा करने पर आपके सामने एक Menu Open होगी.
- यहाँ से आपको उपलब्ध विकल्पों में से Pin to Taskbar के विकल्प पर क्लिक करना हैं.
- ऐसा करते ही वह Item Taskbar पर लग जाएगा.
Mouse Drag द्वारा Programs को Taskbar पर Pin करना
- Mouse Dragging द्वारा Item को Pin करने के लिए आप पहले उस Item पर Left Click दबाकर रखिए.
- इसके बाद उस Item को पकडकर Taskbar पर खींच लाइये और छोड दीजिए.
- ऐसा करने पर वह Item Taskbar पर Pin हो जाएगा.
Taskbar पर Buttons को Unpin करना
- Taskbar पर Pinned Buttons को Unpin करने के लिए उस बटन पर Right Click दबाइये जिसे Unpin करना हैं.
- ऐसा करने पर आपके सामने कुछ विकल्पों की सूची खुलेगी.
- यहाँ से आपको “Unpin this program from taskbar” पर क्लिक करना हैं.
- ऐसा करते ही वह Item Button Taskbar से Unpin हो जाएगा.
आपने क्या सीखा?
इस Tutorial में हमने आपको Windows Taskbar के बारे में पूरी जानकारी दी हैं. आपने Taskbar के विभिन्न भागों के बारे में जाना है. और Taskbar पर Items को Pin और Unpin करना भी सीखा हैं. हमे उम्मीद हैं कि यह Tutorial आपके लिए उपयोगी साबित होगा.
#BeDigital


Thank you so much
to all TP staff 🙏🙏
.I don’t know more about this subject but I have satisfied to all words, wchich are used in this subject.
Tere is explain by a simple language.
Again
Thank you
Team TP Staff
Bhut hi aasan bhasa me samghaya h
बहुत आसान भाषा में बताया है धन्यवाद
I am not know what is the meaning of pin in computer but I am satisfied this.
अमन जी, शुक्रिया इसी तरह पढते रहिए और सीखते रहिए.
VERY NICE
I m a teacher and I’m satisfied this..
i saport me
Very very super knowledge sir,
THANK YOU SO MUCH .. HUM BAHUT HI ASAN TARIKE SE SIKH LIYA OR HUME YE APKA TARIKA BEHAD PASAND AAYA